The chill of winter is upon us. As the temperatures drop, our thoughts turn to creating a warm, cozy environment in our homes. An effective heating system is crucial for maintaining a comfortable indoor climate. However, the right lighting is an often overlooked factor that can work hand-in-hand with your heater to create an inviting atmosphere. The goal is to illuminate your rooms in a way that accentuates the heat being produced, making the space feel even toastier.
In this article, we will explore the link between lighting and perceived warmth, and how to use different lighting elements to complement your home’s heating system. Proper lighting techniques can maximize the efficiency of your heater, reducing energy use while still allowing you to bask in radiant warmth. Let’s examine how lighting and heating work together to create the ultimate cozy, energy-efficient home during the winter months.
Understanding the Psychology of Lighting and Warmth
Before delving into specifics, it helps to understand some of the psychology behind why certain lighting elicits a feeling of warmth. The interplay of lighting and temperature perception in humans is complex. But generally, certain factors in the lighting environment can subtly influence how our bodies perceive the ambient temperature.
Some key points:
Color temperature – Light bulbs with lower kelvin ratings (2700K-3000K) emit a yellowish, “warm” tone that makes us feel warmer than the bluish “cool” tones of higher temperature (5000K+) bulbs.
Brightness – More luminous, brighter spaces feel less cozy and warm than lower lit, dimmer spaces.
Indirect lighting – Light scattered and reflected softly around a room contributes to a warmer ambiance than harsh direct overhead lighting.
Pro tip: Install dimmable 2700K LED bulbs in table lamps, sconces, and pendant lights to create a warm, cozy glow. Use brighter, whiter light only where needed for tasks.
By leveraging these psychological and biological aspects of lighting, we can enhance the heat being produced in a given space, making chilly nights feel toastier.
Using Wall Sconces to Spread Inviting Warm Light
Wall sconces are likely the most underutilized light fixture when it comes to complementing a home heating system. This is unfortunate because few fixtures can create a warmer ambient glow throughout a room.
Here are some benefits of using wall sconces:
Provide ambient uplighting that spreads a soft, even light through the space. Dark, gloomy corners disappear.
Give off localized pools of light by chairs, sofas, and other seating areas to provide eye-pleasing task lighting.
Often use candle-like bulbs that emit a natural, incandescent-like warm color. This enhances the coziness of the heat being produced in the room.
Can be controlled with dimmers to create multiple moods and temperatures of light. Dimmed low in the evenings, they emit a romantic, tranquil glow.
Available in a wide variety of styles to match any decor, from traditional to modern. Pick ones that complement your rooms.
Are hardwired for safety and positioned higher up on walls, keeping them out of reach of pets and kids. This makes them ideal for leaving unattended.
Some tips for effectively using wall sconces:
Position them approximately 60 inches up from the floor and 7-12 inches away from corners or furniture for ideal light distribution.
Place them approximately 6-8 feet apart around the room perimeter to cast an even wash of light across all walls.
Use warmer 2700K LED bulbs or actual candles to emit a cozy, welcoming glow.
Install individual dimmer switches to control the mood in each room.
Positioning Floor Lamps to Enhance Heating Efficiency
With some smart positioning and bulb selection, floor lamps can be used to draw warmth from your home’s heating system toward where you need it most. This allows you to turn down the thermostat slightly while still feeling comfortably heated.
Here are some floor lamp placement tips:
Aim near seating: Angle floor lamps to beam light and warmth towards sofas, chairs and reading nooks. This directs radiant heat where people will be sitting.
Corner off “dead zones”: Heaters often leave corners or distant parts of a room chilly. Carefully placed floor lamps help recirculate rising heat to solve this issue.
Illuminate thermostat: Don’t let the thermostat be in darkness! The localized heat from a nearby lamp tricks it into thinking the whole room is warmer than it really is.
Accent cool windows: Position floor lamps slightly angled towards windows to offset the chill radiating from the glass. The light and warmth help neutralize this effect.
Use “warm” bulbs: Pair your placed floor lamps with 2700K or lower LED bulbs to amplify the cozy factor. This accentuates the impact of the heat being produced.
Proper floor lamp aiming puts light and warmth exactly where you want it. This allows thermostats to be lowered without sacrificing comfort!
Selecting Shades to Regulate Light and Heat Flow
Windows bring in treasured natural light during the day. But at night in winter, uncovered windows also allow precious heat to escape while letting in icy chill. Fortunately, the right window shades can help address these issues.
Here are some thermal shade selection tips:
Blackout shades – Completely block nighttime light and seal in heat. Best for bedrooms.
Insulated shades – Have a layer of insulation to slow heat transfer. Reduce heat loss by 25-50%.
Honeycomb shades – Have insulating air pockets. Reduce heat loss by 20-25%
Thermal linings – Attach a thermal backing to regular shades to add insulation.
Closure system – Ensure shades seal tightly in the closed position to prevent air gaps.
Manual or motorized – Consider ease of raising and lowering shades based on heating needs.
North/South shade needs – South facing windows need shades most to block summer sun. North facing rooms need insulation in winter.
Light coloring – Lighter colors reflect more daylight in the room. Darker shades absorb and trap more heat.
Select insulating shades to regulate heating efficiency, then pair them with smart lighting to create the perfect mood.
Using Pendant Lights to Illuminate from Above
Hanging pendant lights are ideal for providing downlighting over specific living spaces. When combined with warmer bulbs, they can create localized “bubbles” of light and heat perfect for reading or socializing.
Some benefits of pendant lights include:
Direct light exactly where needed most with adjustable heights and angles.
Complement floor and table lamps with overhead ambient lighting.
Hang multiples at different heights for dramatic lighting effects.
Utilize many bulb and shade styles to match room decor.
Install over seating areas, workspaces, kitchen islands and more.
Often available with dimmers to control brightness and mood.
Tips for heating efficiency:
Use “warm” 2700K LEDs or smart bulbs to magnify coziness.
Position over seating/reading areas to provide task lighting.
Slowly dim lights as the evening progresses to ease sleep.
Group multiples over large spaces for more even heat distribution.
Flexible pendant lights let you put warmth and light right where you want it most. Strategically place them to enhance your room’s heating efficiency.
Choosing Table Lamps to Boost Focal Warmth
Table lamps are likely the unsung heroes of home heating. Their up-close-and-personal glow provides the ideal task or accent lighting to make small spaces feel warm and inviting. Position them intelligently to create focal points of light and warmth.
Ideal table lamp uses include:
Bedside lamps for nighttime reading light without having to heat the whole room.
Sofa side lamps positioned close to users boost perceived warmth.
Living room end table lamps to warm seating/conversation areas.
Office desk lamps to direct warmth to where you’re working.
Stylish buffet lamps to highlight the decor and provide dining room task lighting.
Tips for maximizing coziness:
Choose lamps with warm-hued fabric lampshades to soften and diffuse the glow.
Look for 2700K, dimmable LED, or smart bulbs to control color temperature.
Position lamps as close to seating areas as possible while avoiding glare.
Slowly dim lamps in the evenings to ease the transition to sleep.
Table lamps give you complete control over directing warmth and light precisely where needed most. Use them strategically to enhance heating comfort.
Sculpting Light with Portable Space Heaters
When positioned near a portable space heater, lamps act as sculpting tools that direct warmth and light to the spaces that need it most. This allows you to locally heat just small areas without cranking up central heating.
Tips for combining heaters and lamps:
Angle a floor lamp toward the heater to help spread rising warm air wider throughout the room.
Place a space heater near a seating area and position a nearby table lamp to focus radiant heat.
Locate heaters near chilled spaces like drafty windows or corners and use lamps to push warmth into these zones.
Adjust lamp brightness and color to make the heat feel intensified. Brighter, whiter light makes rooms feel cooler.
For safety, only leave portable heater/lamp combinations running when the room is occupied and avoid flammable surfaces.
With some careful positioning, lamps can help portable space heaters warm up small zones without heating empty spaces. Target the heat where you want it.
Mounting Sconces by Entryways for Instant Warmth
The entryway can be one of the chilliest spots in winter as cold air gusts in every time someone comes or goes. This makes it a prime spot for some heating-focused lighting. Mounted wall sconces provide an instant dose of welcoming warmth.
Some entryway sconce placement tips:
Install a matching pair of sconces, one on each side of the doorframe to provide balanced light.
Position approximately 60 inches up from floor level to illuminate visitors’ faces.
Use opaque shade sconces that direct light only downward to avoid glare.
Choose metal or glass sconces to withstand knocks from jackets and bags.
Look for designs with ‘arms’ that project light further into the entry zone.
Install dimmable, warm-colored 2700K LEDs that turn on bright to greet visitors and then dim after they’ve come inside.
A single, semi-flush ceiling fixture can provide similar downward, glare-free light for small entryways.
Welcoming entryway sconces deliver warmth, safety and visual appeal in one blow while making your home feel toasty from the moment guests arrive.
Illuminating Artwork to Increase Visual Warmth
In the bleak midwinter, our eyes crave the visual warmth, color and beauty only artwork can provide. Make the most of your home decor by illuminating it with strategically placed lighting. When done right, it creates captivating focal points that appear to radiate warmth.
Tips for lighting artwork:
Position picture lights or rail fixtures above eye level and angle down onto the artwork. This avoids glare.
Look for LED picture lights offering museum-quality, glare-free illumination.
For indirect ambient lighting, install sconces or directional lights on side walls that create even illumination.
Boost visual warmth by using a lower temperature, 2700K LED lamps. Brighter cool white light diminishes coziness.
Use dimmers to highlight and fade artwork to match the room’s evolving ambiance through the evening.
Group coordinating framed pieces together into a gallery wall and light them collectively for dramatic effect.
Frame cold-toned winter artwork in warm wood and illuminate it with accent lighting to make it feel crisper.
Properly illuminated artwork punctuates interior spaces with visual warmth and beauty. Place it strategically near seating areas so the colors and textures can be admired and savored.
Combining Recessed and Track Lighting
Recessed can lights and track lighting offer two distinct lighting functions that can be used in conjunction to increase heating efficiency. Combining them creates ambient uplighting as well as focused spotlighting.
Here are some tips for coordinating recessed and track fixtures:
Use recessed lights for general room illumination. Space evenly to provide diffuse ambient light.
Reserve track heads for accent lighting art, architectural elements, wall units and display cases.
Install both systems on separate switches or dimmers so mood and contrast can be controlled.
Choose “warm” 2700K lamps in both systems to support heating. Brighter “daylight” lamps feel harsh in the evenings.
Position recessed lighting to bounce softly off walls and eliminate shadows in seating areas.
Aim track heads strategically to highlight decorative items, avoid glare and provide task lighting.
Zone lighting so track heads in living areas can be turned off while recessed lights stay on for safety.
Thoughtfully combined recessed and track lighting fills in shadows, eliminates dark corners and puts light exactly where you need it most. The result is an environment that feels warmer, yet requires less overall energy to heat.
Warming Up a Room with Skylights
Skylights are a unique way to literally “bring the sunshine in” during winter, warming rooms with free solar heat. When combined with proper light fixtures, they create brighter, more open, and naturally heated spaces.
Here are some tips for integrating skylights with artificial lighting:
Install skylights on south-facing sections of the roof whenever possible to maximize winter solar gain. North-facing skylights provide even ambient light.
Use recessed lighting around the edges of the skylight to provide soft fill lighting at night when the sky is dark.
Consider a solar tube skylight with a diffuser that spreads daylight more evenly throughout space instead of a focused hot spot.
Install roller shades that seal tightly over skylights at night to limit heat loss through the glass.
Incorporate sun-dimming automated shades that adjust throughout the day for glare control.
Use warm color temperature (2700-3000K) bulbs in surrounding fixtures to augment the natural tones of sunlight.
Position spotlights, sconces, or picture lights to accent architectural details and artwork illuminated by the skylight.
Skylights paired with efficient lamps bring the warmth and beauty of natural light indoors while reducing the need for as much wasteful overhead lighting during the day.
Decorating with Twinkle Lights for Cozy Sparkle
Nothing signals the holiday season quite like festive twinkle lights. But the tiny LEDs can also create year-round magic when used creatively. Adding pockets of gentle sparkle makes rooms feel more inviting and heated.
Some ways to incorporate twinkle lights:
Drape lights along headboards or poster beds for a cozy nighttime glow.
Wrap trunks of potted plants and trees to create a warming wintery shimmer.
Outline architecture like interior arches, niches and window frames.
Festoon lights along curtain rods or edges of valence boards.
Place inside glass vases or containers for a contained twinkle.
Accent the undersides of cabinets and shelves.
Adhere around mirrors or artwork for unique illumination.
Layer strings of larger C7 or C9 vintage LED bulbs for more sparkle.
Use a central dimmer to control multiple strands simultaneously.
Twinkle lights add charm, warmth and a welcoming glow to any space year-round. Sprinkle them generously throughout rooms to brighten up winter.
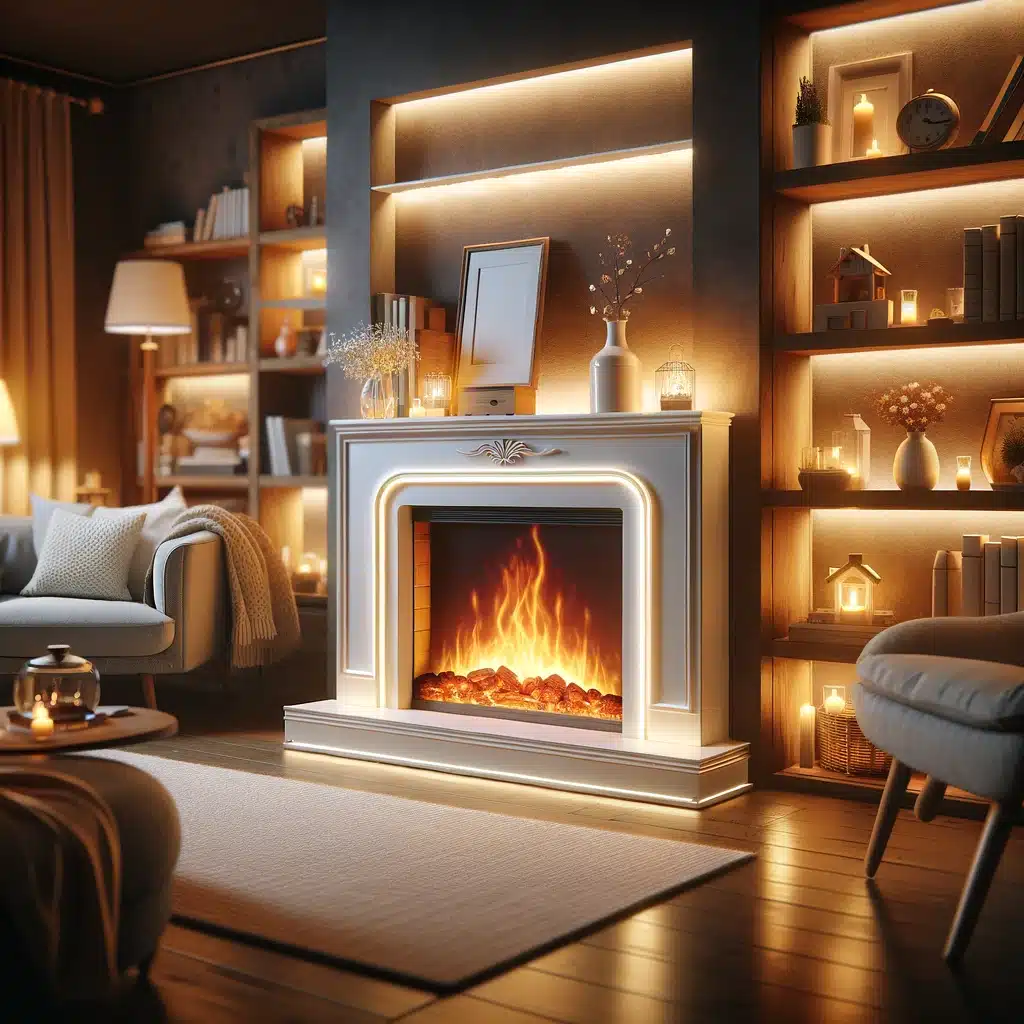
Illuminating Mantels for Added Heat Distribution
The fireplace mantel is the perfect spot for lighting fixtures that visually simulate the warmth of an actual fire, even when the fireplace isn’t in use. The right mantel lighting also makes this key architectural feature the focal point of a room.
Tips for effectively lighting mantels:
Install two matching can lights or directional lights above the mantel aimed downward to eliminate shadows on objects below.
Position a picture light, rail fixture or sconce centered directly above the mantel to accent the artwork placed there.
Mount a pair of sconces on the wall a few feet outside the edges of the mantel to graze light in towards it.
For fireplaces lacking a mantel, position lights just above where the mantel line would be.
Choose LED bulbs with a very warm 2700K color temperature so light coming from above mimics fire glow.
Install the lights on a dimmer so the mantel can be made more or less of a dramatic focal point.
Use C7 or C9 vintage style Edison string lights on the mantel itself to simulate flickering flames.
Proper mantel lighting provides the illusion of a cozy fire, attracts attention to this key architectural feature and helps recirculate rising warmth back into the room.
Layering Lighting for Maximum Flexibility
The most energy efficient and visually appealing rooms artfully blend layers of adjustable lighting. This allows maximum flexibility to create ideal mood, task illumination and heating enhancements as needed.
Provide smooth, shadow-free overall illumination with recessed or pendant ambient lighting.
Add portable lamps for flexible personalized task lighting.
Install switches or dimmers for each layer to independently control brightness and color.
Using Smart Lighting to Automate Heating Efficiency
Smart lighting opens up an exciting new world of automatically customizing the lighting environment to maximize heating comfort and efficiency. The right smart bulbs and products let you program the perfect coordination of light color, intensity and heating.
Benefits of smart lighting include:
Schedule when lights turn on/off as days get shorter to match usage patterns.
Simulator “sunrise” wake up and “sunset” bedtime routines with slowly increasing/decreasing light.
Automatically change color temperature from cool white daylight to warm sunset.
Enable voice control through smart speakers to turn lights on/off or dim without getting up.
Use geofencing and presence sensing to turn lights on only when occupants are home.
Link bulbs to the home’s HVAC system so lights adjust automatically to supplement heating/cooling.
Some smart products to consider
Philips Hue bulbs, GE Cync, Nanoleaf, LIFX, Wyze bulbs
Ecobee, Nest, Honeywell WiFi thermostats
Lighting control pads like Lutron Caseta
Voice assistants like Amazon Alexa, Google Home
Smart lighting delivers effortless automation so your home can heat and illuminate itself optimally while consuming the least energy. It’s the ultimate in cozy efficiency!
Positioning Reading Lights for Nighttime Warmth
Few pastimes feel more soothing than curling up with a great book on a cold winter night. Make sure reading nooks have lighting positioned perfectly to avoid eye strain while keeping just the immediate area surrounding you heated.
Ideal reading light placement:
Angle the light source slightly behind your shoulder instead of directly in front.
Position reading lamps as close to you as possible without causing glare.
Adjust lights to cast illumination downward across the pages rather than into your eyes.
Use arms or pivoting heads to direct the beam precisely. Side clips or clamps can also attach shades right onto furniture.
Choose compact, low-wattage bulbs like LEDs that give off gentle, focused light for close tasks.
Install a dimmer switch to adjust brightness as needed. Brighter light causes more eye fatigue.
For ultimate flexibility, wearable book lights give full control over directing the beam.
Strategic reading light positioning reduces eye strain while creating a warm, cozy halo around you and your book on chilly winter nights.
Creating Drama and Coziness with Wall Washing
Adding a touch of drama while enhancing the architecture is easily achieved with wall washing. This technique “washes” a vertical surface with grazing light to highlight the textures, colors and details. It can make entire walls or focal points seem to glow with radiance.
Tips for effective wall washing:
Position light sources at an oblique angle to “graze” the wall rather than directly at it.
Recessed cans, track heads, pendant lights and even tall floor lamps can provide grazing angles.
Use warmer 2700K LED lamps to make the light feel cozy and inviting, accentuating any heat sources.
Try illuminating textured stone, brick, or wood walls and paneling for striking effects.
Use wall dimmers to precisely control the intensity. Brighter light diminishes coziness.
Consider small profiles like puck lights to accent architectural niches and details.
Grazing a wall washer across a textured surface bathes it in a warm glow while highlighting interesting architectural elements like the fireplace.
Illuminating Ceiling Details for Openness and Warmth
Don’t neglect to light up! While we often focus lighting downward, be sure to also accent architectural elements overhead. Properly illuminating ornate ceiling details make spaces feel larger, brighter and more heated.
Tips for lighting ceilings:
Install recessed can lights with wide flood angles around the perimeter to splash light upward and eliminate shadows.
Position pendant lights high enough to help draw the eyes upward and highlight medallions, domes, coffers and other details.
Replace outdated flush mount fixtures with new wide-distribution LED lights.
Focus adjustable track heads or image lights to accent deeply recessed ornate patterns.
Wall wash coved ceiling areas and soffits to highlight interesting details.
Use dimmers to vary light levels from a soft ambient glow to full nighttime brightness as needed.
Choose ceiling paint colors that reflect and diffuse light. Deeper tones feel more intimate.
Proper overhead lighting is the missing ingredient that can take rooms from feeling dark and confined to bright, expansive and filled with warmth.
Layering Ambient and Task Kitchen Lighting
The kitchen is ground zero for layers of lighting working in tandem to complete multiple functions. Adequate ambient, task and accent lighting ensures this hub of activity is safer, more usable and feels properly heated.
Some kitchen lighting layers to incorporate:
Ceiling ambient – Recessed LED lights or decorative pendants for overall light.
Task – Under cabinet lights and track heads to illuminate countertop work zones.
Accent – Cabinet lighting and picture lights shining on decor.
Ambient – Sconces flanking the sink and stove for additional glow.
Safety – Nightlights, step lights and strip lighting along floor edges.
Tips for cohesive lighting design:
Connect layers to separate switches and dimmers to control contrasts.
Use motion sensors or occupancy detectors to automatically turn lighting on and off as needed.
Position task lighting to avoid casting shadows from your body onto the workspace.
Choose LED lamps with high color rendering (CRI 90+) so food appears natural under all lights.
Kitchen lighting must check the boxes for safety, utility and ambiance. When designed thoughtfully, your kitchen can work smarter, feel more comfortable and consume less energy.
Managing Glare to Maximize Visual Comfort
Glaring, uncomfortably bright light defeats the purpose of lighting a space to feel warm and inviting. Illumination levels should transition smoothly, with no harsh light striking the eye directly. Follow some basic guidelines to ensure optimal visual comfort.
Strategies to prevent glare:
Never use bare bulbs. Always use shaded fixtures that diffuse and soften the light.
Install sconces, pendant lights and can lights with opaque shades that emit a gentle glow downward or upward only.
Angle picture lights and other directional fixtures to hit walls near, but not directly on, artwork.
Use matte finishes on surfaces. Glossy finishes bounce harsh reflections into the eyes.
Position floor lamps behind seating to avoid shining directly into faces.
Site pendant lights directly above sitting areas like dining tables to avoid glare from looking up into the light.
Your eyes will thank you after you’ve reduced glare and created a uniformly heated and illuminated environment. The payoff is greater comfort and visual warmth.
Choosing “Warm” White Bulbs
With the wide availability of LED and smart lighting, the days of being stuck with cold, clinical fluorescent lights are over. The color temperature emitted by light bulbs is measured on the kelvin scale, and lower kelvin numbers around 2700-3000K provide the warmest hues.
Benefits of warm white light bulbs:
Enhance feelings of comfort, coziness and relaxation, supporting your home’s heating.
Reduce eye strain and visual fatigue compared to harsh blue-toned bulbs.
Make skin tones, food and furnishings appear more natural and appealing.
Enable adjusting the ambiance from invigorating brightness during the day to a tranquil glow in the evening.
Support circadian rhythms at night with amber tones that encourage healthy melatonin production.
Pair with tunable white smart bulbs to automatically transition from cool daylight to warm sunset.
Choose warm white or amber smart bulbs in most fixtures to make your winter nest feel welcoming while supporting healthful sleep (and lower heating bills)!
Adjusting Light Intensity with Home Automation
One of home automation’s most useful functions is managing lighting settings automatically in coordination with your daily routines and spaces. This includes adjusting intensity levels to complement heating needs. Here are some of the benefits:
Schedule lights to turn on/off when needed so no energy is wasted illuminating empty rooms.
Create “scenes” like movie night with accent lighting dimmed to add coziness to your family room.
Program sunrise simulation to help energize you awake and sunset fading to ready your brain for sleep.
Automatically dim lights when the TV is turned on to make the video “pop” more while using less energy.
Sync colored accent lighting to respond to music playlists or media for immersive effects.
Link lighting to temperature sensors so colors and intensity adjust automatically to supplement your home’s heating.
Home automation puts precise management of the ideal lighting environment at your fingertips. It’s like having a personal lighting designer!
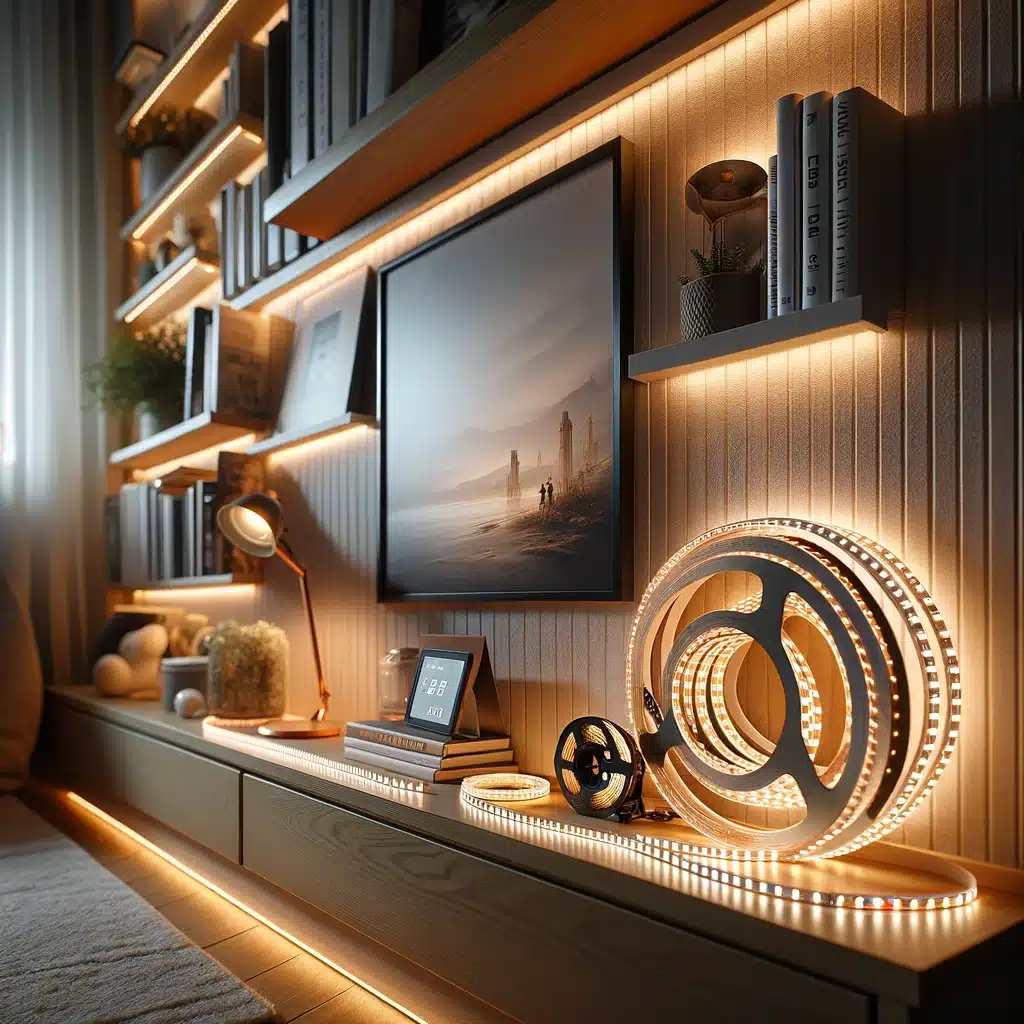
LED Strip Lights for Warm DIY Accents
Self-adhesive LED strip lights make it easy for anyone to install customized accent lighting. Used creatively, these LED “tapes” add a touch of personality while enhancing warmth. Light levels and colors are also adjustable.
Tips for using LED strip lights:
Affix under cabinets, shelves, beds and other surfaces for indirect ambiance.
Outline architectural details like crown molding, dados and doorframes.
Adhere around the back of TVs/monitors for dynamic bias lighting that reduces eye fatigue.
Attach to the underside edges of outdoor patios, gazebos and pergolas for a warm glow.
Use RGB strips to highlight transparent objects like vases, glassware and lamps with changing colors.
Install inside display cabinets to spotlight collections.
Look for high density options with more LEDs per foot for brighter, more uniform lighting.
Always use the included adhesive backing and avoid using nails which can damage wiring.
Let your creativity run wild enhancing spaces with customizable LED strip lights. They’re an easy DIY way to make rooms more colorful and inviting.
Mixing Various Lamp Styles for Eclectic Warmth
While matching all fixtures creates uniformity, mixing varied lamp styles and shapes in a space adds an eclectic, collected look and supplies lighting diversity. Distinct fixtures also provide opportunities to reinforce warmth in smaller zones as needed.
Some tips for effectively blending lamp styles:
Choose a finish palette to unify mixed metals like brushed nickel, oil rubbed bronze and aged brass.
Vary heights, shapes and lamping, but keep the room’s color temperature consistent using 2700-3000K.
Use curvilinear shapes to contrast with boxy forms. For example, pair orb pendants with rectangular sconces.
Alternate glass types like clear blown glass, seeded glass and translucent glass for interest.
Incorporate unexpected light sources like lanterns and even vintage lamps for whimsy.
Contrast sleek modern fixtures with classic ones like candlestick-shaped sconces or turned wood table lamps.
Carefully curated lighting diversity creates intrigue while allowing you to put specialty fixtures exactly where they can enhance heating efficiency most.
Illuminating Closet Interiors and Shelving
Finally being able to clearly see inside closets to locate needed items is a game changer. The right lighting transforms not just closet interiors, but also any shelving or cabinetry storing clothes and linens.
Here are some closet and cabinet lighting ideas:
Use battery powered puck lights for easy DIY installation and flexibility in shelves or drawers.
Adhere battery-operated closet light strips to the bottom shelves to illuminate below.
Install strip lighting under shelves and inside drawers for unseen illumination.
Choose warm white strips or pucks to prevent clothes from appearing discolored.
Look for motion sensor options to light up automatically only when needed.
Position cabinet lighting to avoid glare that makes it hard to see contents.
Link lights to door switches to activate when opened and off when closed.
Proper closet and cabinet lighting makes it effortlessly easy to retrieve needed items while making small spaces feel more spacious. No more fruitless fumbling in the dark!
Using Mirrors to Reflect Light and Warmth
Strategically positioned mirrors can make darkened spaces feel instantly brighter and warmer by reflecting light and heat sources back into the room. Like lighting, mirrors can completely transform the look and feel of a space.
Tips for using mirrors:
Hang mirrors across from windows so daylight is amplified back inside.
Position mirrors to “catch” warm light sources like lamps and bounce warmth back into the room.
Use mirrors to compensate for rooms with only one window or light source by doubling perceived brightness.
Place mirrors behind candle groupings or mantle arrangements to intensify the lighting and warming effects.
Choose mirrors with integrated lighting like Hollywood-style vanity mirrors with glowing bulbs surrounding the glass.
Install mirrored closet doors to expand the feeling of space and reflect lightning inside.
With smart placement, mirrors become powerful tools for maximizing both lighting and heating in a home by making the most of every photon and BTU.
Adjusting Lighting for Daytime, Evening and Nighttime Needs
One of the most impactful ways to create an inviting living environment is adjusting the lighting intensity and color temperature to match the task and time of day. The ideal settings for midday, evening and nighttime are vastly different.
Tips for tuning lighting to the time of day:
Use bright, white daylight (5000K) bulbs in workspaces and kitchens during the morning/early afternoon to energize.
As the sun sets, dim lights and switch to lower, warmer 2700K bulbs to ease into evening relaxation.
At night, use the lowest light levels possible, just bright enough for safe navigation using warm amber or red night lights.
Install separate switches and dimmers for daytime overhead vs. nighttime accent lighting to allow tuning.
Set lighting schedules with smart bulbs and automation systems to automatically adjust lighting based on time and activity.
Lighting tuned to fit our natural circadian rhythms makes spending time at home more enjoyable while supporting healthy sleep patterns.
Bouncing Light off Ceilings for Softer Illumination
The most pleasing and natural-feeling lighting illuminates spaces indirectly with light bounced off ceilings and walls rather than shining directly from bulbs. Uplighting minimizes shadows and provides even, uniform ambient fill lighting for superior warmth.
Tips for bouncing light:
Use matte finish rather than glossy paint on ceilings and walls to better reflect light.
Choose wider “mushroom” shaped lampshade designs that aim light upward.
Install recessed can lights with reflectors that angle toward the ceiling instead of straight down.
Position pendant lights high enough over spaces like kitchen islands to illuminate the ceiling.
Place floor lamps in corners to splash ample light off both adjoining ceiling surfaces.
Use wall sconces or wall-mounted up and down lights to achieve indirect illumination.
Take light fixture aim into consideration and utilize ceiling bounce to emulate warm, inviting daylight indoors even after dark.
Front Porch Lighting for Curb Appeal and Safety
The front entryway leaves a visitor’s first impression, so lighting it attractively enhances curb appeal while improving safety and visibility. Use light creatively to help welcome guests and illuminate walking paths with warmth.
Tips for effectively lighting front porches:
Mount matching fixtures on both sides of the front door at eye level to brightly light visitors.
Accent architectural details like columns, gables and rails with discreet up-lighting.
Use shaded downlights to eliminate glare and evenly illuminate stairs.
Line walking paths with low-voltage walkway lights or path lights for safe navigation.
Incorporate wall sconces by seating areas so faces are easily visible.
Install porch ceiling fans with built-in lighting for overhead ambient fill working in tandem with accent lights.
Use photocells or timers to automatically turn lights on at dusk and off later at night when not needed.
Great curb appeal comes down to the details. Strategic lighting transforms your entryway into a welcoming focal point while improving safety and energy efficiency.
Accenting Gardens and Landscapes for Extended Enjoyment
Outdoor lighting extends our ability to enjoy gardens, patios and landscapes long after sunset. Nighttime lighting reveals their unique textures, forms and colors in new dimensions while making outdoor rooms feel warm and inviting.
Tips for illuminating gardens and yards:
Floodlight taller architectural plants and tree canopies from below to mimic moonlight.
Use LED path lighting to gently illuminate winding walkways without glare.
Spotlight water features and sculptures to make them gorgeous focal points.
Hide small uplights behind shrubs and structures to create silhouetting.
String festoon lighting between structures and trees to create a magical canopy overhead.
Use lighting to develop distinct “outdoor rooms” like a fire pit conversation area.
Link lighting to smart controls like motion sensors and timers to automatically turn on at dusk and off later at night.
Outdoor lighting unlocks landscapes at night while boosting safety and energy efficiency. It expands and connects living areas seamlessly.
Selecting Dimmers for Total Light Control
Replace standard switches with dimmers throughout your home to gain total control over creating ideal lighting for both function and ambiance. Dimmers allow custom calibrating of both brightness and warmth to complement your environment.
Advantages of dimmers include:
Set lighting levels precisely for each task like reading vs. cooking vs. dining. No more squinting or eye fatigue.
Create optimal relaxation and sleep readiness by dimming lights in the evening and transitioning to warmer colors.
Spotlight artwork or architectural details at full intensity then dim background lights to make them pop.
Maximize energy savings by keeping lights lowered as often as possible without sacrificing comfort.
Avoid jarring on/off lighting transitions that disrupt moods. Smoothly raise or lower lighting to transition between activities.
Investing in quality dimmers provides the versatility to adapt any space to the ideal lighting needs, whether for function or ambiance. Dimmers transform fixed overhead lighting from a utility into an interior design element. They unlock lighting’s full potential for health, enjoyment and energy savings.
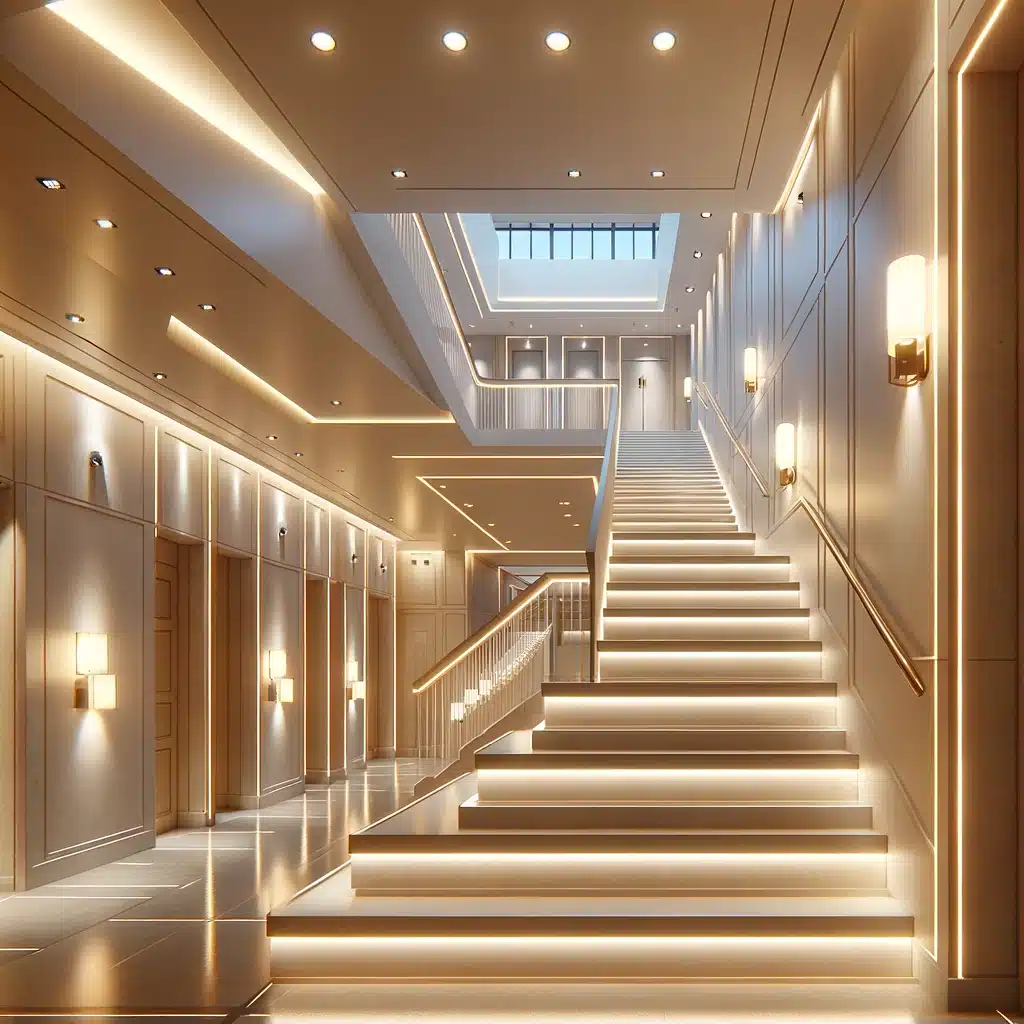
Illuminating Staircases and Hallways for Safety
Stairs and hallways are often vehicle areas that get shortchanged when it comes to lighting. But these “transition zones” deserve ample warm illumination to keep the flow and avoid hazards. Apply these safety lighting tips:
Position light fixtures directly over each stair tread instead of just at the top and bottom. This provides consistent visibility along the entire run.
Use wall-mounted sconces flanking staircase entry points to illuminate landings and the top few steps both upstairs and downstairs.
For long hallways, space ceiling or wall fixtures every 6 feet or so to prevent dark stretches in the middle.
Install stair lights on risers or low-profile fixtures in treads to avoid tripping hazards and head bumps. Options include LED strip lighting or mini step lights.
Incorporate path lighting embedded into decking or at ground level to outline changes in floor plane or architectural transitions.
Use motion sensors or occupancy detectors to activate stairwell and hallway lighting automatically only when needed.
Proper stair and hallway lighting improves navigation and safety while also making transitional spaces feel welcoming instead of dark and undefined.
Illuminating Basements and Attics for Safety and Utility
Boosting underused attic and basement spaces into fully functional areas starts with lighting that makes them brighter, safer and more hospitable. Choose fixtures wisely to turn these expansive but often partly unfinished places into cherished living and storage zones.
Tips for illuminating attics and basements:
Space recessed can light every 6-8 feet around the full perimeter to provide uniform ambient lighting from above.
Use exposed bulb industrial pendants and bare shop lights to light workbenches cleanly and brightly.
Incorporate strong task lighting like articulated work lamps for focused illumination where needed.
Add accent lighting like tracks and picture lights to feature architectural details and display collectibles.
Use floor lamps like chopper lights to direct illumination precisely where required around seating areas.
Position safety lighting like step lights along stairs and exits to clearly indicate transitions and pathways.
With smart lighting upgrades, unused attics and basements transform into cherished living spaces for activities, storage, workshops, or even guest suites.
Choosing Color Schemes to Make Rooms Feel Warmer
Paint and textiles with rich, saturated warm hues inherently feel cozy and inviting compared to lighter, cooler colors. Integrating warm color accents into room designs brings spaces to life while supporting a heated atmosphere.
Some tips for utilizing color:
Incorporate warmer neutral wall colors like tans, browns, taupes, camel and beige which reflect light softly.
Use accent walls in tones of orange, red, yellow and terra cotta to lift spaces and evoke heat.
Choose wood stains and natural fiber textiles like wool and cotton in warm, darker natural tones.
Layer in whimsical patterns featuring warm colors like florals, stripes, ikats, or animal prints.
Select lampshades and lamp bases in stained glass, wood, marble, or metals like brass and copper which feel substantial and traditional.
Contrast warm colors with cool blue and green tones in accessories to emphasize the depth of the warmer tones.
Enveloping a room in multi-layered warm coloring supported by cozy textures and lighting creates a heated sanctuary.
Positioning Lighting to Balance Brightness
Properly distributing lighting to balance illumination minimizes dark shadows in corners while eliminating hot spots that cause glare. Place fixtures strategically to achieve even, uniform lighting without dead zones.
Tips for positioning fixtures:
Site ceiling lights slightly forward of center in a room to compensate for light drop-off in rear corners.
Alternate floor lamps and table lamps on opposite sides of seating areas to balance light dispersion.
Use sconces flanking a bed, sofa or fireplace to light these features evenly from both sides.
Locate recessed cans symmetrically on a room’s focal point like over a mantle or gallery wall.
Space multiple pendants evenly over kitchen islands, dining tables or workspace desks for shadowless even lighting.
In hallways, stagger sconces on alternating walls so light overlaps down the full length.
Take ceiling height, room proportions and furniture layout into account when positioning fixtures for optimal cozy brightness from all angles.
Safely Showcasing Collections with Display Lighting
One of life’s great joys is displaying prized collections prominently. The right lighting highlights treasured items prominently and safely. Follow museum-quality preservation standards to protect your artifacts.
Tips for safe display lighting:
Use indirect lighting like top-mounted tracks to spotlight items without exposing them to excessive light or heat.
For delicate organic displays like textiles, feathers or flowers, limit illumination to 50 lux or less.
Avoid placing lamps or sconces too close to artworks or artifacts which can accelerate fading.
Look for LEDs with UV-filtering lenses which help protect organic pigments from fading.
Set lights on timers or occupancy sensors so illumination is minimized whenever displays are not being viewed.
Position lights above eye level and tilted down to avoid glare and maximize visibility.
Maintain even illumination across all parts of a display to avoid overly bright hotspots.
By mimicking museum and gallery display conditions, your collections will stay preserved and feeling comfortably illuminated.
Choosing Light Bulbs for Color Quality
For lighting to feel natural and comfortable, the bulbs you choose must accurately portray colors instead of casting an unflattering or harsh hue. Look for bulbs rated 90+ on the color rendering index (CRI) scale for the best color quality.
Benefits of high CRI bulbs:
Skin tones look lively instead of dull, pale or unnaturally tinted
Paint colors, fabrics, carpets and other finishes render their true colors under high CRI light.
Food appears vivid and appetizing making cooking and dining more enjoyable.
Reading and detail work is easier without colored shadows distracting from materials.
Making cosmetic and clothing color choices is easier with lighting that shows accurate colors and contrasts.
Artwork and collectibles display their intended coloring allowing materials to be discerned.
High CRI LED bulbs accurately portray all the colors in your home to make spaces feel comfortable, usable and inviting while supporting visual health.
Mapping Light Switches Strategically
Conveniently positioned and smartly mapped light switches allow easy control over a room’s lighting layers from the moment you enter. Avoid outdated single switches that operate all lights together.
Tips for planning switch locations:
Position a switch for overhead ambient lights right inside the entrance to every room.
Map separate switches for task lights like undercabinet kitchen lighting near their corresponding work zones.
Use dimmers for accent lights so their contribution can be precisely controlled.
Include switched outlets near the floor and table lamps so peripherals can be turned on before entering the room.
Install smart switches allowing voice activated, scheduled or remote smartphone control for ultimate convenience.
Group switches together logically and label them clearly to identify which lights each operates.
Strategically mapped switches put every room’s lighting at your fingertips so the environment can be tuned perfectly to your activities and warmth needs.
Creating Lighting Scenes with Home Automation
One of the most useful home automation features for lighting is the ability to save and activate custom preset “scenes” with a simple voice command or tap. This allows matching lighting instantly to activities for convenience and ideal warmth.
Examples of handy lighting scenes:
Reading mode – Turns on living room accent lights to optimal brightness while dimming other lights
Movie night – Darkens accent lights and slightly dim overhead lights
Dinner party – Brightens kitchen and dining room lighting to high intensity
Bedtime – Gradually dims and warms light over 15 minutes to prep for sleep
Vacation mode – Randomly turns lights on and off in the evenings to simulate occupancy
Scenes allow custom tailoring lighting to match occasions and needs with the optimal luminosity, color and contrast for heating efficiency and enjoyment.
Adding Lighting to Kitchen Cabinets
The kitchen can never have too much lighting. One of the best upgrades for visibility and ambiance is adding lighting inside cabinets and under them. This highlights contents while eliminating shadows over countertops.
Lighting options to illuminate cabinets include:
Battery operated LED puck lights for instant, adjustable undercabinet task lighting.
Hardwired LED strip lighting for uniform undercabinet edge illumination.
Wireless LED strips with removable magnetic backing for slide-in installation.
Low voltage mini LED spotlights to shine down from above within cabinets.
Occupancy sensors to automatically turn lights on when doors open and off when closed.
Door switches to activate lights automatically when cabinets are in use.
Glass cabinet doors to allow ceiling and wall light to shine through contents.
LED lighting integrated into shelves to spotlight items from underneath or behind.
Thoughtfully placed cabinet lighting provides clearer visibility in a key kitchen workspace while making it more inviting.
Illuminating Shared Office and Workspace Areas
In shared live/work spaces used by multiple people, lighting demands differ from dedicated home offices used by one person. Lighting must flex to accommodate varied needs and uses.
Tips for lighting open workspaces:
Use recessed ambient lighting on ceilings to brightly illuminate the overall space uniformly during work hours.
Incorporate desk lamps to allow personalizing task lighting at each station.
Position floor lamps in seating/lounge areas for a softer after-hours glow when less task illumination is needed.
Install pendant lights over communal worktables for easily adjustable brightness suited to the current activity.
Include wall-mounted shelf lighting to spotlight reference materials, books or decor.
Use smart switches allowing schedules and scenes to tailor lighting to occupied workspace modes versus after-hours relaxation.
Flexible workspace lighting accommodates diverse needs, prevents eye strain and makes shared live/work spaces more comfortable.
Showcasing Architecture with Skillful Lighting
Truly elegant lighting subtly showcases the beauty of architecture and interior design while fulfilling practical illumination. Just as art gallery lighting draws attention to the artwork, residential lighting should flatter the home itself.
Tips for using light to showcase architecture:
Graze illumination across textured surfaces like brick, shiplap siding, or stone to accentuate natural form.
Install sconces flanking doors, windows, or room dividers to accentuate symmetry and proportions.
Spotlight repeating architectural patterns like arched colonnades, coffered ceilings, or panel moldings.
Discretely backlight display niches and transparent cabinets to highlight their form.
Frame rooms with rear uplighting that create a cove-like glow effect near ceilings.
Use picture lights or directional spotlights to highlight cherished artworks and ornamentation.
When lighting complements and enhances interior architecture, the spaces exude refined elegance and feel more welcoming.
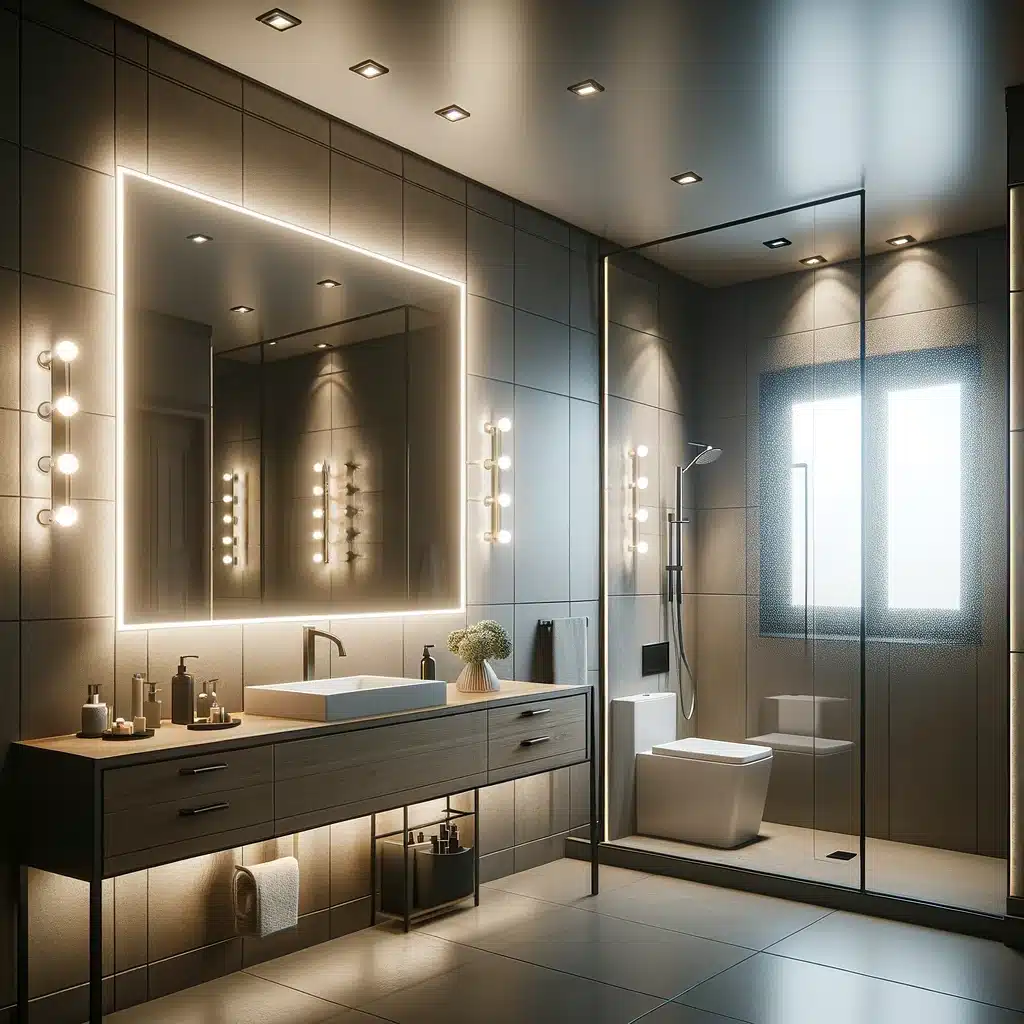
Practical Bathroom Lighting for beauty and function
Bathroom lighting serves many needs from overhead ambient fill to task lighting at mirrors and showers. Choose fixtures purposefully to make bathrooms safer and more usable while enhancing the architecture.
Tips for planning bathroom lighting:
Use flush or semi-flush ceiling mounts for overall ambient illumination without protruding fixtures.
Incorporate recessed can lighting around the perimeter to reduce shadows.
Install sconces beside mirrors at 60″ height for ideal illumination when grooming.
Choose waterproof shower lights that won’t steam up while providing light for cleaning.
Use elongated LED strips to brightly illuminate inside medicine cabinets and vanities.
Add accent lighting on artwork to make bathrooms feel more like relaxing spa retreats.
Include vent fan lights to provide both illumination and moisture control.
Thoughtfully layered bathroom lighting makes self-care routines easier and safer while setting a warm, welcoming mood.
Lighting for Health, Safety and Accessibility
Proper lighting takes on greater significance as we age or if mobility is limited. Brightness, glare control and illuminating transitions prevent hazards while maximizing independence. Some key considerations:
Install the highest wattage allowable in fixtures to combat age-related vision loss that reduces light sensitivity.
Use touch lamps, remote controls and voice activated lighting to eliminate the need for fumbling with switches.
Position floor lamps and reading lamps closer to chairs and beds for easier reach.
Add supplemental lightings like path lights and step lights to clearly indicate floor plane transitions and stair edges.
Install handrails with integrated LED strip lighting to clearly define pathways.
transition zones between spaces.
Ensure at least two light sources per room to eliminate shadows from a single centralized ceiling fixture.
Add bathroom nightlights that automatically illuminate if power is cut off suddenly.
Meticulous lighting accommodates mobility needs, maximizes independence and reduces the chance of accidents at home.
Evaluating and Adjusting Lighting as Needed
To achieve comfortable, glare-free spaces, walk through rooms systematically and assess the lighting quality from multiple positions and angles. Make adjustments until the lighting is uniform and shadow-free.
Tips for improving existing lighting:
Replace bulbs used in floor lamps, table lamps, and pendants with softer, warmer 2700K LEDs.
Move free-standing portable lamps closer to seating areas to increase illumination precisely where needed.
Reposition lamp shades to direct more light upward or downward depending on your needs.
Rotate recessed can light reflectors to shift the lighting distribution pattern.
Relocate track lighting heads if accent areas are too dim or bright.
Add lamps to supplement areas with insufficient lighting.
Install dimmers to precisely control light levels in different parts of a space.
By thoughtfully fine-tuning placement and brightness, existing lighting can often be adapted to create glare-free spaces that feel supremely welcoming.